Gunakan Search form yang terletak pada kanan atas blog ini, Jika ingin berkomentar harap berkomentarlah dengan RELEVAN!.
Dan buat sobat yang mencari template blogger keren sobat bisa cari disini.
Dilarang Copy Paste Artikel disini secara keseluruhan, Jika ingin mengutip harap Cantumkan sumber LINK ke blog ini.
DONATION
Donasi yang kamu berikan akan saya gunakan untuk mengembangkan blog ini menjadi lebih baik. BANK: 72xxxxxx PULSA : 08xx-xxxx-xxx
TECHDEBUTE>>>>>>DOS programs will not
work in any current version of Windows. Generally, these are utilities
that work close to the hardware, such as defraggers and diagnostic
tools. But really, you shouldn’t be running outdated versions of these
tools, anyway.Some DOS games also run close to the hardware, and these might not
work in Windows, either. But these will probably work in a virtual
machine. I discuss that option below.If you don’t know if your PC is running a 32- or 64-bit version of Windows, now is the time to find out. In Windows 7, click Start, right-click Computer, and select Properties. In Windows 8’s Search charm, type pc info, and select PC info. Either way, you’ll find the answer in the System Type field.
Running the 32-bit
version, you can launch a DOS program by simply selecting the .com file.
The first time you do this in Windows 8, you’ll probably be asked about
installing a feature called NTVDM; click Install this feature.
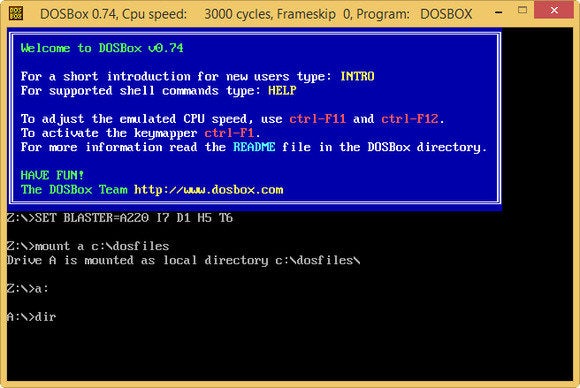
If the program fails to run, or if you’re running Windows 8 x64, try running it in DOSBox. This simple, free program runs DOS in a virtual machine that comes reasonably close to emulating an old-fashioned computer
Windows Explorer (File
Explorer in Windows 8), create a folder as close as possible to the root
of a real drive or partition, and give it a short name without spaces
or punctuation. I recommend C:\DOSfiles. Put your DOS programs and files in that folder.
Start menu's Search field, or in Windows 8's Search charm, type dosbox and select DOSBox 0.74 Options (the number might change). This will bring up a rather large file in Notepad. Scroll to the bottom. Below the flag [autoexec], type in mount a c:\dosfiles. Save the file. From then on, when you launch DOSBox, it will see the C:\DOSfiles folder as drive A:..
TECHDEBUTE SAID..... Knights & Dragons has been voted as the most addictive game of 2013 by leading players. You can rise and build up your team of heroes from folks around the world for thrilling, fast paced battles filled with fun and excitement. The game starts with a beginner level and advances to complicated levels with your every victory. As you create and defeat epic bosses, you get a chance to unlock various items and collect rare treasures.The best thing about Knights & Dragons is it is suited to players of all levels and experience. No matter whether you are a newbie player or a professional game enthusiast, you can be certain that you will be able to quench your gaming thirst by playing this wonderful game. Above all, you don’t have to pay anything to play this fantastic game.Thus, Knights & Dragons come with many amazing features. Appealing graphics, suitability to all types of gamers, free to play app, interesting and engaging battles etc are few of the many features of this epic battleship game. If you wish to beat epic creatures and conquer the virtual empire, try this engaging game with your loved ones and mark your victory over others in this thrilling game.
Download Knights & Dragons for your PC you will need the BlueStacks App Player program. The application allows you to run Android apps on Mac OSX or Windows systems, install a definite number of apps, as well as sync apps from Android devices to desktop systems. Let us see how.install Knights & Dragons, you will need to have a Google account which will associate BlueStacks with the Google Play Store. You can register with your existing Google+ account. If you do not have one yet, you will need to create one. Apart from Google Play, BlueStacks connects with two more app stores – Amazon and 1 Mobile. All you need to do is to go to the app search section of the program and enter “Knights & Dragons”. You will be directed to the store that features it. Once you are there in the store (for example, in the Google Play Store), you can then navigate the features of that specific store and find the Knights & Dragons app. You can download Knights & Dragons without any difficulty and the installation will be performed automatically by Blue Stacks itself.sync apps from your android device, you will need to go to Blue Stacks’ app sync section. First, you will need to download an app called Cloud Connect which is sourced by Google’s Android Market. Once the download is complete, you will need to move to the settings section of Blue Stacks and click on Cloud Connect. This will direct you to a window asking you for your email id and your android phone number. Once you provide the details, you will receive a pin number that will be sent to your mail account by Blues tacks. You will be asked to provide this pin number when you opt to sync your existing android device apps to your PC. Remember however, that this will only sync the apps themselves to your PC system. As of now, Blue Stacks does not equip you to sync app data.
Here i am giving tutorial for who want to use or play Emulator games without Jail breaking your iPhone and IOS based devices. Apple has a few restrictions when it comes to apps in the App Store. It doesn’t allow video game emulators, bittorrent clients and screen recorders. Usually the only way to get them on your iOS device is to jailbreak your device.
There is a way to sideload apps without jailbreaking, using Apple’s Enterprise Certificate, which allows companies to sideload their private apps. By obtaining one, developers can easily install their non-Apple-approved apps on iOS devices.
Using this method, many developers have started releasing apps without the use of the App Store. A website called iEmulators.com gathered these apps and have set up a way to install them on your iOS device, all through the web browser. Below we will show you how to easily install a sideloaded app on your device.
Firstly, go to the iEmulators home page with your iOS device. From here you can choose an app you would like to download to your device. Open it and tap "Download" or follow the link if it’s an external site. If a prompt appears, confirm your download.
If it does not, you will need to change the Date & Time (instructions in the next section), then press "Download" again for it to start.
Changing The Date & Time
After downloading the app but before you open it, you need to change the date & time of your iOS device. The OS will confirm if the app is using a valid enterprise certificate based on the certificate’s time stamp. This date will be different, depending on the app you have downloaded (refer to the individual app instructions for the proper date to set).
Go to Settings > General > Date & Time and switch it to an earlier date, and turn off Set Automatically. Then, open the app. Next, toggle Set Automatically back ON within Date & Timeto restore your device to the current date.
If all goes well, your brand new, sideloaded app will now be on your non-jailbroken iOS device. If your app stops working, try setting your time back to 2012 and reopen the app. This may be needed every once in a while to keep the app in working order.
TECHDEBUTE SAYS Windows end-of-service deadline finally upon us, a
lot of holdouts are hurriedly making the upgrade to Windows 7 or 8.
Moving all your important files from Windows XP to your new computer may
sound like just one more hassle.Fortunately, it doesn’t have to be that
hard at all. Here are four simple options for transferring your data
from Windows XP to a new PC without breaking a sweat.
Transfer
your data to a new computer is by manually moving it from one PC to the
next using removable physical storage, like a flash drive or external
USB hard drive. The upside to this option is that you don’t have to
download any software or go through any special steps. Just plug your
external drive into your old computer, drag your files over, and then
plug it into the new computer and drag the files back.first is that
you’ll actually need enough physical storage to make the transfer. If
the only external storage you have is a 512MB flash drive you got at a
Circuit City in 2007, it’s not going to be practical for transferring
large amounts of data.
Fortunately, external storage has gotten
quite cheap. You can get a reliable, brand name 500GB external hard
drive for $70 on Amazon or New egg. Not only will it help with the data
transfer, but you’ll be able to use it to back up your important files
in the future.
CLOUD BASED STORAGE:
storage
service such as Dropbox. This can be a convenient way to transfer
documents, but be aware that transferring large files (such as home
movies) over a cloud-storage service can take a long time and eat into
your monthly broadband cap, if you have one.Beyond that, free cloud
services tend to offer small 5GB to 10GB storage limits, which may not
be enough storage to handle all the data you want to transfer. Paying
for additional cloud storage can overcome that hurdle, however. You can
even piece together 50GB to 100GB of free cloud storage, if you don't
mind creating accounts with several companies and putting in a little
sweat equity.
A cloud service also requires that you manually pick
the files to move over. If you’re not comfortable deciding which files
to transfer, you might find one of the following two automatic
file-transfer applications helpful.
WINDOWS EASY TRANSFER TOOLS BY USING:
Windows
7 and 8 come with a built-in tool for transferring user data from one
Windows PC to another, called the Windows Easy Transfer tool. This
application basically does what we described in the previous section
transferring the contents of the Users folder for you, and also
transfers over your user accounts and settings, unlike the previous
options. It’s included in Windows 8 and 7, but you’ll have to download
it for the Windows XP computer.
Once you’ve downloaded
the file and installed it, just run “Windows Easy Transfer Tool for
Windows 7” on your Windows XP computer and walk through the steps.
Choose “An external hard drive or USB flash drive” when asked where you
want to save the data, and then wait while the application scans your
system.You’re given the option to password-protect your files, if you
like, then asked where to save the file that contains all the data to be
transferred. Choose to save it to your external hard drive, or to a
cloud storage service.
Using Windows Easy Transfer to transfer XP data to a Windows 8 PC.
On
your Windows 7 or 8 computer, just open the Start Menu or Start Screen
(respectively) and type “Windows Easy Transfer,” then click on the
utility application with that name. Click next, then click on the button
marked “Yes.” This will allow you to navigate to the file you saved on
your external hard drive or cloud storage folder. The Easy transfer tool
will automatically transfer over documents, bookmarks, and other User
data.
Techdebute says PCs aren't as pricey as they used to be, but that doesn't mean you want to swap them out all the time, especially since processor technology long ago reached a "good enough" point for many people. Most modern programs can run just fine on PCs that are six or seven years old or even older! and the push to move many services to the cloud is only making older PCs less of a drag on productivity.Upgrades like installing RAM or increasing hard drive capacity are great ways to help improve performance right away, but there are simpler ways to help extend the useful life of your PC. Keeping your system physically clean, following some basic preventive measures, and exercising common sense in Daily use to add years of Life To Your PC.
KEEP IT SPARKLING:
Unless you're working in a clean room, virtually every PC becomes filthy with dust, dirt, hairballs, and other unfriendly goop given enough time. Left to linger long enough, the grime can suffocate the hardware inside your PC, generating more heat and therefore putting stress on the components. This can reduce performance and even contribute to a component's premature death. Depending upon the environment, you should clean your computer system thoroughly every 6 to 12 months. Maybe now is a good time? Do it along with your spring cleaning! For pointers, see TECHDEBUTE guides to cleaning desktops (including mice and keyboards) and laptops.
Hard drives can become corrupt with file system errors and bad sectors due to improper shutdowns, crashes, and other issues. This corruption can damage files, cause system instability and blue screens, and even prevent Windows from starting if things get really bad. However, the corruption can usually be found and automatically repaired by running the Check Disk tool that comes with Windows.Thus, these are more of a concern if you’re using Windows 7 or earlier.Improvements to error handling introduced in Windows 8 can fix more file and drive issues automatically.Check Disk offers a few different scanning and repair options. For your initial scan and every few months thereafter I’d recommend a full scan, enabling both automatic repair of any file system errors and the scan and repair of any bad sectors. Unfortunately, this can take up to a few hours to complete, and you can’t use the computer during that time when running it on the system drive.
You can run Check Disk Without automatic repair for a less
intensive check that usually takes just 5 to 10 minutes and can run
while you're using your computer. You might want to run this quick check
every month and follow up with a full check if any errors are fou
ou can run Check Disk without
automatic repair for a less intensive check that usually takes just 5
to 10 minutes and can run while you're using your computer. You might
want to run this quick check every month and follow up with a full check
if any errors are found.
full check in Windows 7 or earlier, enable both options and click Start.
Then you’ll be prompted to schedule it for the next restart. When
you're ready to run the check, simply restart the PC and it will begin
the check before booting into Windows.For a quick check in Windows 7 or earlier, disable both options and click Start. Once complete it will display the results.
In Windows 8, once you open Check Disk it will let you know if there
are known issues. If errors are present it will recommend a full scan
and repair. If none are detected, it still allows you to do a quick
check. Once that’s done, regardless of whether errors are found, it will
then allow you to do a full scan if you prefer.
Check Disk utility in Windows 8 and later first shows if errors have been reported and offers a quick scan and then a full scan. The full check's results run by quickly before booting into Windows, but you can retrieve them once in Windows.
Hi Guys ! You got a Edited Files and thats Time to Share you'r files them rest of the World. Means the Fiding the Hosting service and Getting people Know it's,So Techdebute said by the All Podcasting to share and Editing files to Compare to Techdebute currently Hosting it'sPodcastinonSoundCloud.managementsystem automatically ensures that it appears in the iTunes Store’s podcast feed.The Macworld website has a Techdebute Podcast blog, where people can find all episodes. It also appears in Macworld’s news feed each Wednesday. And Breen and other staffers tweet and post Facebook links to it.
OTHER PODCASTING APPLICATIONS FOR CREAT A NEW PODCAST:
ERIKA ENSIGN:
Erika use the Libsyn podcasting-hosting service to house her show’s audio files, but she isn’t enthused about their blog options. Instead, she uses a WordPress blog to post episode write-ups with links to stream/download the audio. She also uses the blog for non-audio content such as “Last Word” posts (for anything they didn’t get to say while recording) and “My Two Cents” posts (so contributors who weren’t on an episode can still weigh in).Contributor bios and other show info reside there, too. There’s a prominent “About Us” section that includes links to iTunes, the podcast RSS, and the blog RSS (including a separate comments feed for the “healthy and active community chatting on our website”).When she posts a new episode (or non-audio content), she publishes the link on Twitter, Facebook, and Google+. Each of the participants also usually shares those posts on their personal feeds. Episodes also automatically appear on the Doctor Who Podcast Alliance page. She used to paste episode release posts on a well-known Doctor Who forum, but they didn’t generate much traffic, so she stopped.She and her fellow participants also appear on other podcasts, where they promote Verity! as much as possible. (“It also doesn’t hurt that most of our contributors are Hugo Award-nominated.”)
Store with your shiny new HTC One, and you’re ready to crank some tunes through those Boom Sound speakers, when you realize: you don’t have any tunes. You spent the last 10 years buying music in iTunes, and now it’s locked in Apple’s walled garden, where only the Apple Faithful with their iPhones and iPads are deemed worthy enough to listen to it.But you paid for that music, and you deserve to listen to it on whatever device you want! Fortunately, the Google Music Manager makes it easy to import all your iTunes music into Google Play Music, where you can download or stream it to your Android devices. Here’s how to do it.
NOW INSTALL GOOGLE MUSIC MANAGER:
download is complete, launch the setup application and Google’s Music Manager app will automatically be installed. This
probably goes without saying, but be sure to sign into Music Manager
with the same Google Account you’ll use as your primary account on your
Android device. Once you’ve entered your account credentials, you’ll
want to upload your music to Google Play.The first option that
pops up lets Music Manager scan your iTunes folders for music files, and
after a quick scan, you’ll be asked whether you want to upload all your
songs and playlists, or only a selection of your songs based on your
established playlists.
NOW YOU CAN ACCESSING YOUR MUSIC FILES ON YOUR ANDROID DEVICE:
Once the upload process is complete, all of your music will appear in the Google Play Music app on your Android device. This comes preloaded on most phones, but it’s also available on the Play Store if you don't already have it.you can do that in one of two ways. All music you’ve uploaded to your Google Play Music cloud is available for streaming whenever you have an internet connection. Just tap on a song or playlist to start streaming If you need offline access to your music (going on a plane or to a place with shoddy reception and no WiFi), you can tap the Pin on any album, song or playlist, and that music will be downloaded to your on-device storage for offline playback.You can venture into settings and make it so your music will only be downloaded over WiFi, something we highly recommend in today’s world of limited data plans.