Sunday, 22 June 2014

How To Access iCloud Files From Mac- Easy

How To Access iCloud Files From Mac- Easy

Hi Guys! iCloud serves many purposes these days. One of its main functions is document storage for the iWork suite (Pages, Numbers and Keynote) and other apps. problem with using iCloud for document storage is that it’s a black hole: Once you save a document to iCloud, you can only access it again with the same app, or its sibling, in OS X or iOS. If you have a problem with one of those iCloud apps it won’t launch, say, or an update broke it you may not be able to access your files at all.Fortunately, there are other ways to access iCloud documents on your Mac. As long as you have the Documents & Data option checked in the iCloud pane of System Preferences, iCloud copies all the documents stored in your iCloud account to your Mac, so you can work with them offline. If you ever need to access such files, there are several ways to do so.

                     
iCLOUD FILES FINDER:

iCloud files are stored in the folder ~/Library/Mobile Documents. (The tilde symbol is a shortcut for your user folder.) Go to this folder (Finder > Go > Go to Folder), and you’ll see a number of sub-folders, one for each app. Some of these are OS X or iOS apps. If you save files with those apps, you’ll find copies of their files there. (Other apps may use such folders to hold settings for OS X or iOS apps.
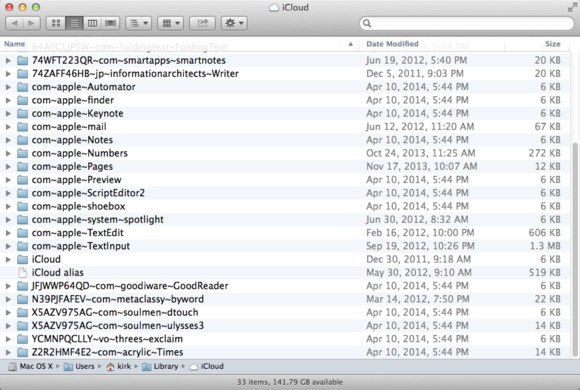
            icloud finder

 Folder with the name of the app that saved it. Some are obvious: For example, the folder /com~apple~Pages contains Pages documents; ./com~apple~TextEdit holds your TextEdit files. Other folders have seemingly random characters an the beginnings of their names, but app names at the end.An easy way to see all your files in the Finder is to do a search from the Finder’s search field. When you’re in the Mobile Documents folder, just type a period in that field, and the Finder will find all documents with dots, or file extensions. (Make sure Mobile Documents is selected, rather than This Mac, in the Search bar.) Next, click the add (+) button below the search field, then choose Kind is Document; this will weed out a lot of settings files. Then delete the dot in the search field, and you’ll see all of your iCloud documents, from all of your apps, even if they don’t have extensions.
Click Save to save this search as a smart folder; you can then put it in the Finder sidebar to have one-click access to all your iCloud files.
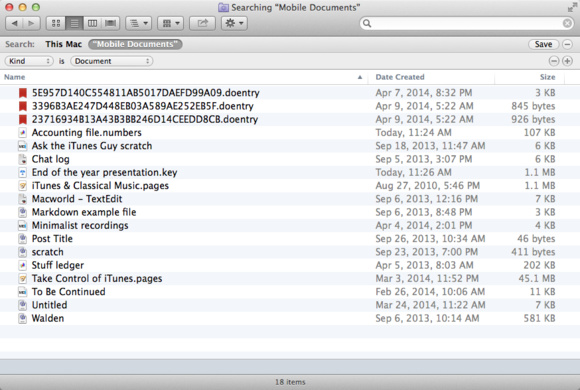
              icloud search
iCLOUD FILE BROWSERS:
 iCloud files are stored locally on your Mac, several third-party apps let you browse these files, in a more user-friendly manner than using the Finder. free Plain Cloud is a simple app that displays a list of apps for which you have items in iCloud. Click on an app name, and Plain Cloud opens a Finder window with that app’s items. It can be a bit confusing, since Plain Cloud lists all apps that store stuff in iCloud, not just those with documents that you can access. But if you’re looking for a specific app’s files, they’re just a click away.
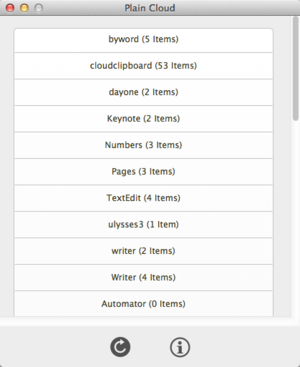
                                                    plain cloud

 File-management methods should replace the way you usually work with documents in iCloud-enabled apps: you should still save your files the same way. But they do offer an alternative way to access your files, when you need it.
ALSO LATEST NEWS FOR TECHNOLOGY : CLICK HERE
LATEST ANDROID APPS : CLICK HERE
Saturday, 21 June 2014

How To Upgrade Your Old PC (or) Laptop With images

How To Upgrade Your Old PC (or) Laptop With images

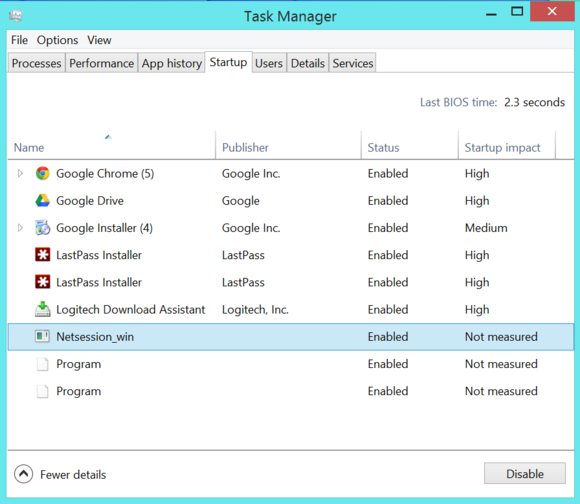
Hi Friends! PC’s hardware isn’t actually becoming slower, though. Startup programs, junk files, and even clumps of dust are just weighing it down. If you give your PC’s software and hardware a quick tune-up, it should run like it did the day you bought it. Inexpensive hardware upgrades can even make your PC run faster than it ever did.Many programs install system tray utilities or services that piggyback onto your system's startup routine, slowing your PC's boot time and wasting valuable RAM. In Windows 8, right-click your taskbar, select Task Manager, click More details, and use the Startup tab to disable programs you don’t need. The Task Manager even tells you how much time each program adds to your boot process.


HOW TO UPGRADE PROCESS WITH IMAGES:

          Windows 8 Task Manager manage startup programs

Windows 7, you can use the Startup manager in CCleaner to change which programs start after a boot. In CCleaner, navigate to Tools > Startup. Of course if you don’t use a program, you should probably uninstall it entirely from your Control Panel instead of just disabling it.

             windows 7 ccleaner manage startup programs

CLEANUP SYSTEM FILES:

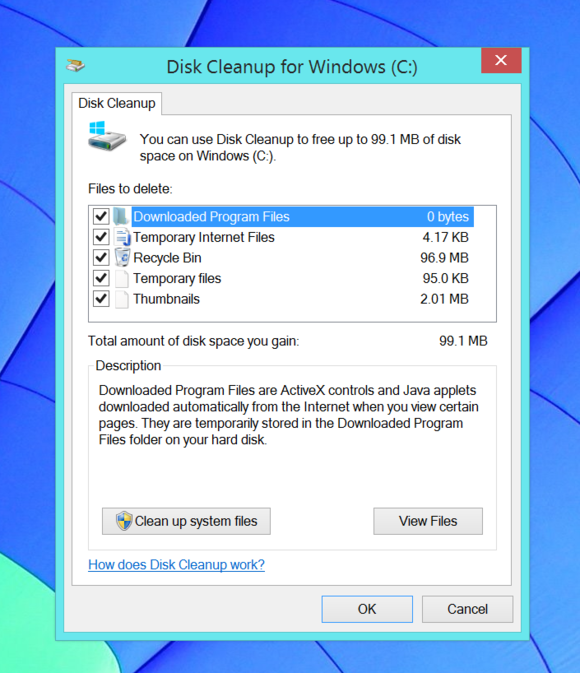
            Windows 8 Disk Cleanup

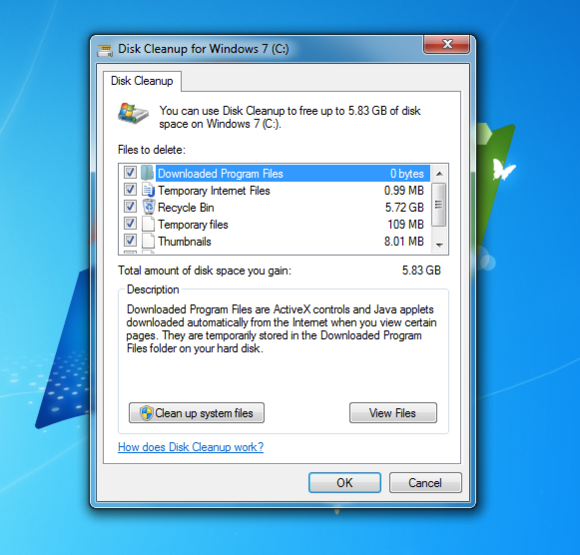
open the Disk Cleanup program on Windows, start by tapping the Windows key to open your Start menu or Start screen. Type Disk Cleanup, and click the Free up disk space by deleting unnecessary files shortcut in Windows 8 or the Disk Cleanup shortcut in Windows 7.

           Windows 7 Disk Cleanup

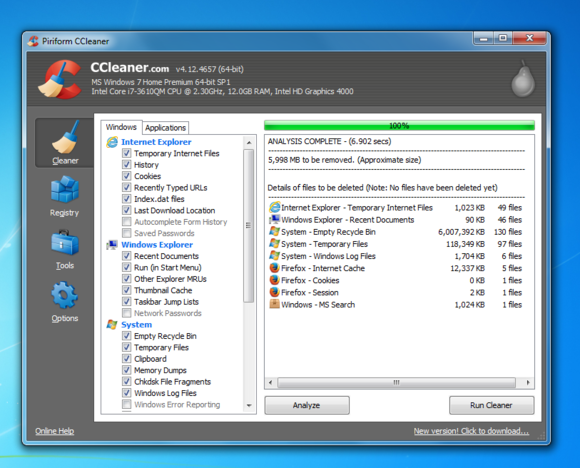
 CCleaner if you want to clean up even more types of temporary files. You may want to tweak CCleaner’s settings first though, as it will erase your browser history, cookies, cache, and other data you may want to keep.

           Windows 7 CCleaner remove temporary files

OPTIMIZE YOUR HARD DRIVE: 

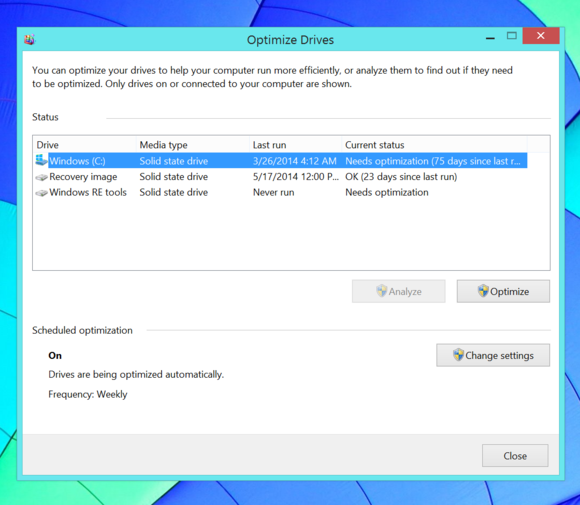
Modern versions of Windows defragment drives automatically in the background, so you probably don’t have to defragment your hard drive manually. Still, it doesn’t hurt to check.Tap the Windows key to open the Start menu or Start screen, type Defragment, and launch the Disk Defragmenter in Windows 7 or the ‘Defragment and optimize your drives tool’ in Windows 8. Analyze your drives, and the tool will tell you whether you need to defragment them.
            Windows 8 Optimize and defragment drives
KEEP SYSTEM MALWARE AND VIRUSES: 
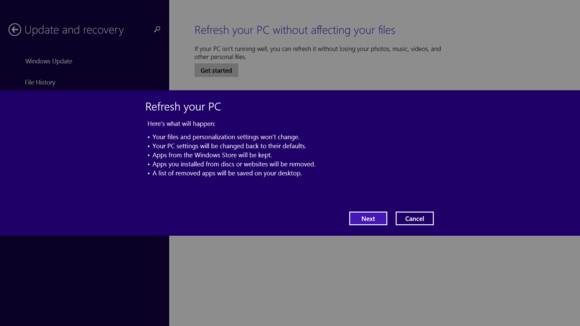
 software and otherwise playing it safe, newer kinds of malware can sneak into your system and hog resources. The nuclear option is reinstalling Windows entirely and starting afresh. In Windows 8, you can use the Refresh your PC feature to effectively reinstall Windows.  You’ll keep your personal files, but you’ll get a fresh desktop system and will have to reinstall your desktop software.
          Windows 8 Refresh PC
Windows 7, you can use your manufacturer’s recovery partition or reinstall Windows 7 from an installation disc.If you refresh your PC or reinstall Windows from your manufacturer’s recovery partition, you’ll need to clean up all that nasty bloatware to make it run as fast as possible.Old computers that came with Windows Vista can probably be sped up by updating them to Windows 8.1 or even Windows 7, but it may not be worth the $100 for a new Windows license. You’re usually better served putting that money towards newer, faster PC hardware.
ALSO READ : CLICK HERE
Top 10 Hidden Features in Windows 8 - Latest

Hi My Dear Friends! Windows 8  the desktop, which looks and feels a lot like Windows 7, and the all-new, all-singing, all-dancing Start page, which is a complete departure for the operating system.If you've just upgraded, it may take you some time to discover all of the tools hidden away in the nooks and crannies of Windows 8, so here are the top 10 hard-to-find features you should be aware of.If you've uncovered some useful tricks of your own, let us know in the comments.


1.SECRET START MENU:

Moving your mouse cursor down to the bottom-left of the screen and left-clicking switches to the tiled Start page... but if you right-click instead, you'll be met with a menu linking to key areas of the operating system, including Control Panel, the command prompt and the Task Manager.

         10 hidden features in Windows 8

2. SYNC YOU'R SETTINGS: 

Windows 8 supports the old user account system, but it can also create a new kind of user account that's linked to your Windows ID, and pulls in information from SkyDrive, Xbox, Hotmail/Outlook and all the other cloud services the company is pushing. linked account can also sync your Windows settings (from your desktop wallpaper to your browsing history) across machines, which is handy if you have multiple computers at home or at work.Launch the Settings charm, then choose 'Change PC settings' and open the 'Sync your settings' page to configure the feature.

                  10 hidden features in Windows 8
3.WINDOWS DEFENDER

Windows Defender is back from extinction, taking over from Microsoft Security Essentials.Unlike Security Essentials, Windows Defender tackles both viruses and spyware, and comes baked into the operating system.You'll notice that it makes an appearance in Windows 8 if you don't already have antivirus and anti-spyware tools in place, leaping into action to plug whichever security gaps need filling.

          10 hidden features in Windows 8

4.  same keyboard shortcut as in previous versions of Windows, but it's worth mentioning here because Windows 8 makes shutting down your PC more drawn out.Rather than opening the Charms bar, clicking Settings, selecting the Power button and choosing 'Shut down', simply press Alt+F4 while viewing the desktop.You can then press Enter to shut down the PC or choose an alternative option from the drop-down menu.

         10 hidden features in Windows 8

5.BUILT IN SCREENSHOTS:

Windows 7 had the Snipping Tool for taking screenshots, and this tool is still around in Windows 8.However, there's an even easier way to capture what's happening on your display  press the Windows key and the PrtScn button together, and a PNG grab will be automatically saved to your Pictures library.

         10 hidden features in Windows 8

6.KEYBOARD SHORTCUTS: 

Swiping and tapping around Windows 8 is fine on a touchscreen interface, but what about standard laptops and desktops?Knowing the keyboard shortcuts for Windows 8 can save you a lot of clicking and dragging with the mouse, and make it easier to navigate the operating system.Win+C brings up the Charms bar, for example, while pressing the Windows key on its own switches between the desktop and the Start page.Another useful one: hit Ctrl+Tab on the Start page to switch to the 'All apps' view.

         10 hidden features in Windows 8

7. SNAP YOU'R APPS:

may already know, Windows 7 allowed you to snap windows to the side of the screen by clicking and dragging the title bar.Windows 8 goes one step further, enabling users to dock a Start page app (like Weather or Bing) to the side while you work on the desktop.you could keep an eye on the forecast while playing around in Photoshop, or stay in touch with your Twitter feed via the People app while crunching numbers in Excel.To dock a full-screen Start page app, drag it from the top to the left or right of the screen. You can run Start page apps alongside each other too.

          10 hidden features in Windows 8

8. FILE HISTORY:

Windows 8 can keep track of previous versions of your important files, which can be a lifesaver if you accidentally delete a document or a favourite photo becomes corrupted.feature - File History - is not enabled by default, so you'll have to activate it from the System and Security section of Control Panel. The only caveat is you'll need a second hard drive available, whether this is external, internal or networked.

          10 hidden features in Windows 8

9.ISO SUPPORT

Windows 7 came with a built-in ISO burner; Windows 8 does away with the burning, and can launch ISOs (and VHD files) natively.Double-click on a downloaded or ripped ISO to view its contents; right-click and choose 'Mount' to run it.Windows 7 came with a built-in ISO burner; Windows 8 does away with the burning, and can launch ISOs (and VHD files) natively.Double-click on a downloaded or ripped ISO to view its contents; right-click and choose 'Mount' to run it.

          10 hidden features in Windows 8

10. RE INSTALL WINDOWS:

Feature you might not come across until something goes wrong - Windows' new reinstall routine, known as Reset (on the PC Settings page).There's no need to dig out discs or serial codes, because everything you need is already available, hidden away on the hard drive.Returning Windows to its factory setting takes a handful of clicks, and has never been easier.Alternatively, you can do a 'refresh', which brings back all the default operating system settings, keeping your personal files, settings, the programs that came with your PC and any applications that you have downloaded from the Windows Store.

            10 hidden features in Windows 8

ALSO MORE: CLICK HERE
Friday, 20 June 2014

Amazon Fire Mobile New Features And Review

Amazon Fire Mobile New Features And Review

Hi Friends! Amazon’s Fire Phone is unlike any other handset I’ve held. Physically, yeah, it’s a slab of glass, and it feels like a basic  well mad Android phone. The difference happens when you press the wake button, and the Dynamic Perspective effect kicks in.Calling it the 3D phone is a little misleading, because you aren’t going to see things flying out of the screen at you. Instead, the image on the screen has depth, and as you tilt the phone you can look around more of the picture bjects in the background will peek out from whatever they’re behind, and whatever’s in the foreground will move faster, giving the image a very 3D-like effect. Think of iOS 7’s parallax effect, only with the knob turned up all the way to the right.


Fire Phone has five cameras on the front—your basic selfie-cam where you’d expect it to be, as well as four cameras in the corners of the device. Those have wide, 120-degree fields of view and infrared sensors so they can track your head, and by determining the X, Y, and Z axes of your head’s location in relation to your phone, simply moving your head also triggers the Dynamic Perspective shift. So you can “tilt” the phone’s image even when the phone is completely still. It’s really neat—almost spooky.Amazon built in several lock screens to really show this off, but the real magic will likely come when third-party developers leverage this technology for their apps. You’ll be able to control games with a head tilt, and even zoom out to see more of a game level by moving the phone a little further from your face.
Now I am very prone to motion sickness. I have parallax turned off on my iPhone, I don’t like 3D movies, and if I try to read anything in the car or on the train, I get nauseated pretty much right away. So I was expecting to hate this motion effect. But in my 30 minutes of hands-on time, it was shockingly smooth sailing. It’s fun to play with, and produces that delightful feeling of technology magic. But if you really hate it, you can turn it off in SettingI probably won’t want to use it on the bus, for example.
                                    amazon fire phone
Amazon is going to sell a lot of these phones, especially since it comes with a free year of Amazon Prime, which includes free shipping, streaming media, and other perks. If you wind up ditching Prime or you are just anti-Amazon for whatever reason, this phone probably won’t be so attractive to you anyway, and it does seem like it’ll be a gateway drug to Prime, which is the gateway drug to Amazon. The built-in apps like Maps (which seems to get its data from Nokia) and the brand-new voice assistant need to take big steps to catch up to what’s on stock Android and iOS, but I won’t judge those too harshly until I get my final shipping version. (Some of the journalists here saw different features, so either we are all really tired or not all the demo phones had the same builds of the prerelease software.

How To Find Bad Ram - How To Fix Good Ram

How To Find Bad Ram - How To Fix Good Ram

Hi Friends!  RAM in your Mac is in essence the active workspace of your computer, in which your programs run and your content is created. Because of this, healthy RAM is vital for properly running any software on your Mac, be it the system software that comes with OS X or third-party programs.Unfortunately, if the RAM in your Mac is faulty, those faults can sometimes persist undetected for a while, only to crop up unexpectedly and result in a crash, hang, or other unwanted behavior. Therefore, it is good to not only be able to identify faulty RAM, but also be able to properly test for it and then be prepared to fix the problem, if it arises.


RAM OPTION'S:

Random Application Crashes: If programs randomly quit unexpectedly, and the generated crash report shows different potential reasons for the crash, this mayindicate bad RAM.
Random Pauses: When a background task is addressing bad memory and is crashing, it may cause the system to continually re-launch it or otherwise hang up when attempting to use this task’s services.
Data corruption: If files you save or access regularly become damaged and cannot be opened, it could be corruption in your filesystem formatting—but it could also indicate faulty RAM.
Random kernel Panics and system freezes: This may happen when core OS components attempt to access bad RAM and crash, resulting in a kernel panic or the system immediately halting.
Three beeps from your Mac at startup: Before the boot chimes sound at startup, your Mac will run a rudimentary check to ensure RAM is available and accessible. If not, then you will hear a series of three beeps from your system, and no boot chime. The system will also not boot when this sound is played.
Other inabilities to boot your system: If you cannot get your system to boot, and especially if you don’t hear the boot chimes, this may suggest RAM is not accessible, and some fault is preventing the system even from issuing the three beeps warning.
While these symptoms suggest faulty memory as a possibility, keep in mind they may not necessarily occur regularly: They may instead happen only when the specific faulty areas of your installed RAM are accessed, the frequency of which may change depending on the amount of RAM installed and how much you use it, which will govern how often the faulty areas of RAM are accessed.
TESTING YOUR RAM:
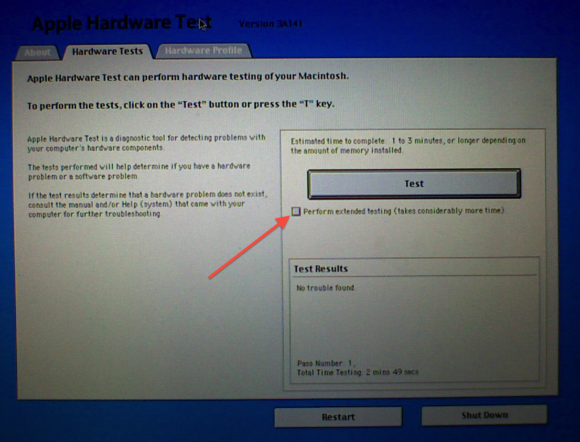
           applehardwaretestextended
 first of these is Apple’s built-in hardware tests suite, which can be accessed by holding the D key down while you restart your Mac. Doing this will load the diagnostics suite. Older systems, this classic utility has a blue interface with information about your Mac and a big Test button. To use it to test your RAM, check the box for the extended memory test (this will run multiple passes and different patterns to the memory), and then click the Test button.
On newer Macs, the tests run automatically when the utility is invoked; it appears with a gray background instead of blue.
Note that, if you have formatted your hard drive and reinstalled OS X, then the built-in hardware tests may have been wiped; however, you can still load them from the Internet by holding the Option-D key combination (as opposed to just D) at startup when you hear the boot chimes.
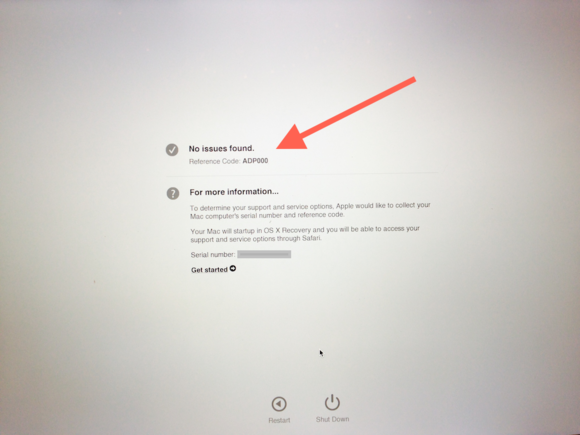
If the hardware test finds any faulty memory, it will list the faulty memory addresses. If everything is OK, you’ll see a message that states all tests passed and no problems were found.
In addition to Apple’s testing suite, there are plenty of third-party memory-testing utilities. One of the most popular is the free memtest, which is run from the Terminal command-line. You can also get a graphical wrapper for memtest, called Rember. But, as I say, there are many of them; just check the Mac App Store and search forRAM. Each will test memory differently and some may miss a problem that another can detect. Therefore, I recommend you use more than one.
           newapplehardwaretestresults
REPLACING RAM: 
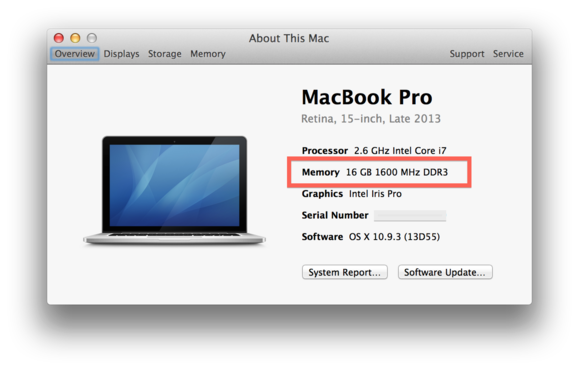
              aboutthismac
 RAM your system uses by choosing About This Mac from the Apple menu, where you should see the current RAM amount (8GB or 16GB, for example), its speed (1600MHz, say), and its type (DDR3 is one possibility). However, that’s not all information you need; it’s missing things like pin counts. You can find that specific information in Apple’s support website, where it hosts an index of instructions for replacing RAM on your Mac.
If your Mac doesn’t support user-upgradable memory (the Retina MacBook Pro, say, or the MacBook Air), then you’ll need to contact an Apple technician.
Finally, if you do replace your Mac’s RAM, be sure to keep the receipts, packaging, and other proofs of purchase for it. Most RAM manufacturers offer lifetime warranties for their products. So upon receiving your replacement, be sure to test it thoroughly, and then do so periodically to ensure it is working correctly. If not, you can then contact the manufacturer for a replacement or a market-value refund of the purchase price.
ALSO READ: CLICK HERE
How To Edit PDF Files in Microsoft Word With images

How To Edit PDF Files in Microsoft Word With images

Hi Guys now a days we are all using mostly in Microsoft Word for PDF Files Working with PDFs has become as common as working with Word docs, but to get the full editing capabilities in Adobe Acrobat you must shell out more than $400 for the Professional version. While there are plenty of less expensive alternatives, the simplest solution might be a tool you already use: Microsoft Word 2013.While previous versions of Word let you save a document as a PDF, Word 2013 allows you to open an Adobe formatted file, modify it and then resave it back to the PDF format without using Acrobat. Microsoft calls this new feature PDF Reflow, and here we’ll show how it works with a file containing text and an image.

                         
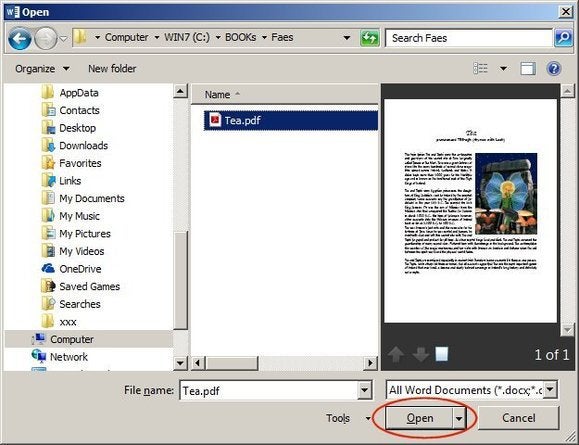
Open Word 2013. Select File > Open, then Browse to the folder that contains your PDFs. Select a file and click the Open button. Notice the selected file appears in the View window on the right. For this example, select a file with text and graphics.

             open pdf

             convert to word dialog box

message warns that large files take longer to load, and the layout in Word may not look exactly like the original PDF. That’s because margins, columns, tables, page breaks, footnotes, endnotes, frames, track changes, and special format options such as font effects (among other things) may differ between the original software used to create the PDF file (such as InDesign, WordPerfect, Microsoft Publisher, Photoshop, etc.) and Word.Microsoft suggests that text documents transfer and reflow better than documents heavily laden with charts and graphics, tags, bookmarks, footnotes, and/or track changes. These additional text blocks often land in the middle of paragraphs or tagged on to the end. Be aware of these limitations so you can plan for the outcome and make adjustments as needed.Many of the layout attributes, however, are compatible and transfer from the PDF directly into Word with no problems. For example, the following image is a copy of the original PDF we opened in Word 2013.

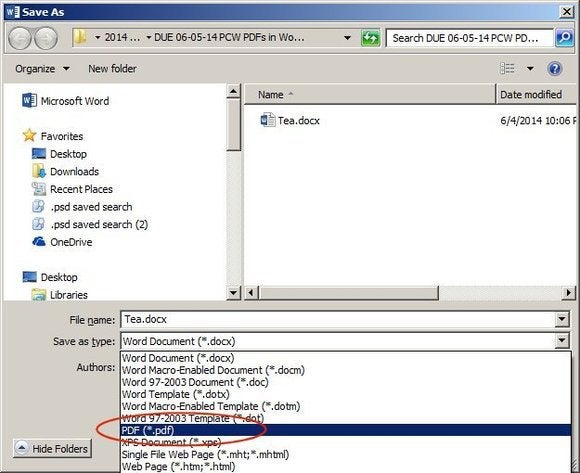
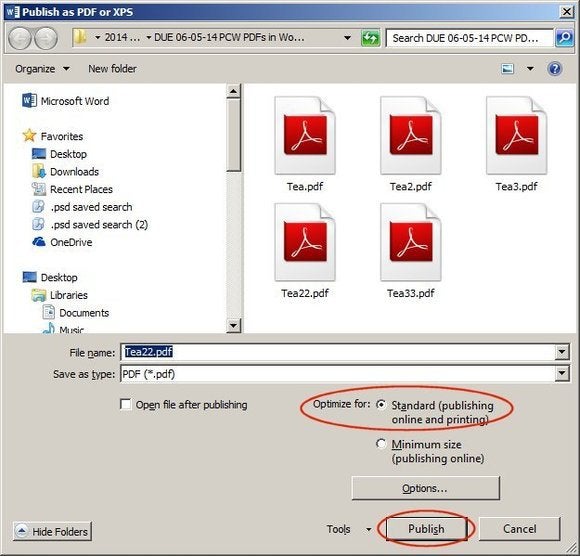
Once the document is altered to your satisfaction, choose File > SaveAs, navigate to the appropriate folder, then choose PDF from the Save as Type dropdown list.
           saveaspdf
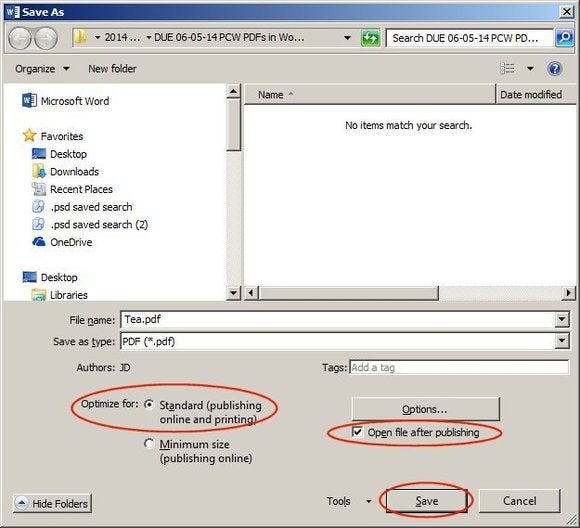
system displays the following PDF file type screen. Choose: Optimize for Standard (publishing online and printing) and check the box for Open File After Publishing, then click Save.
              pdf file type screen

            export pdf
                publish as pdf
 errors in the republished/resaved PDF documents, you may have to go back and reformat the pages. Text will likely re-flow with no problems, but the graphics using text-wrap may disrupt the text flow. If that happens, break up the paragraphs so that one text box ends before the image, then another, new text box begins again after the image. Once that’s accomplished, hard-code the position of the graphic box.
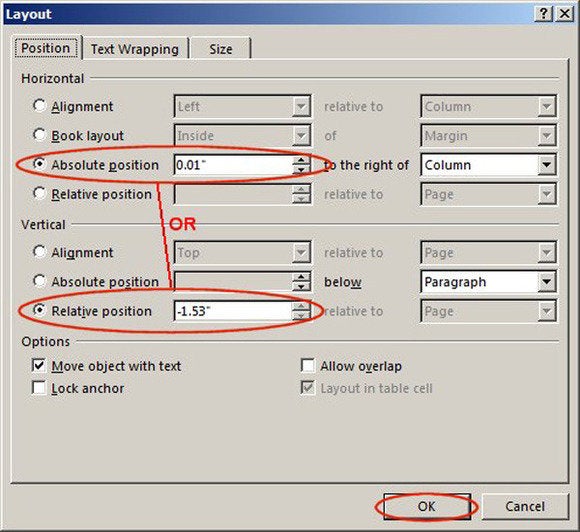
Right click the image, choose Wrap Text>More Layout Options, and the following screen appears:
               positiontextwrapsize
 Text is moved and rearranged in your new PDF, you may want to choose a Relative horizontal and vertical position. This allows the image to move with the text. If you want the image to remain absolutely at the bottom-left side of page one, then choose an Absolute horizontal and vertical position. You don’t have to locate or guess the position, just move the image and the new position coordinates appear in the above box. All you have to do is click Absolute or Relative, then click OK.
Once these decisions are settled, repeat the steps above to re-save or re-export the file to a new PDF.
ALSO READ: C:LICK HERE

Thursday, 19 June 2014

Apple HomeKit hub Features- Latest

Apple HomeKit hub Features- Latest

Hi Guys! Apple’s recent Worldwide Developers Conference, the company announced—among a great many other things HomeKit, a suite of tools for controlling such devices in your home as thermostats, furnaces and air conditioners, smart appliances, lights, cameras, garage-door openers, and security systems. Apple will provide a platform that these devices will be asked to conform to. Do so, and you can control them all from your iOS device.And it sounds great. Imagine your garage door automatically swinging open and your back door unlocking as your car approaches, or a fireplace fwooming into action and lights dimming as you near the front door with your date.
                                                     
Across the country on a business trip and your kid calls and asks if you can flip on the lights downstairs because he’s afraid of the dark. Or a massive heat wave hits at the same time and you want to crank up the air conditioning to preserve the Old Master hanging over a piano sensitive to humidity. Or anticipating that hot date you’d like to crank up the fridge to chill the champagne just a bit more before you get home in an hour. How are you going to communicate with all the devices in your home from such remote locations?If you’re accustomed to using devices such as the Nest Learning Thermostat you already know the answer. You set up an account with Nest and then download its app. Now think about doing that with a dozen or more other smart appliances that you’ll acquire in the coming months and years. Not only would it be a bother to dash from app to app to control your home remotely, but do you really want to provide . Mac or don’t relish leaving their computer running at all hours just so you can switch off the lights necessary to pay for the power your Mac needs to allow such an action.Wouldn’t it be better if each home had a small, power-efficient, always-on, platform-agnostic, Wi-Fi-enabled computer that could talk to your devices both remotely and over a local network?If you haven’t yet glanced over at your Apple TV, now’s the time. Beneath its rounded-rectangular shell is a computer running a form of iOS. One of the beauties of iOS (and its sibling OS X) is that it’s modular. If you need it to take on a different kind of chore, just add a new software component.
                                     
 Benefits should be clear. Here’s the gatekeeper for your home’s gear—appliances as well as traditional computing devices. Image a Back to My Mac feature that can control everything on the network (and, unlike Back to My Mac, actually works all the time).
But it can also provide a needed security layer. Rather than each device sending the intimate details of your home to Nest, Honeywell, GE, and—perhaps more importantly—Google and Facebook, how about if all this information is stored on the Apple TV and hashed for security. When you need to make adjustments or receive reports, data is transmitted via the Apple TV. Your smart appliances remain dumb to any interaction other than what’s been carried on with Apple’s home hub. The devices' original manufacturer is none the wiser to what you're doing with them.
I’ve been wanting a more flexible Apple TV for quite awhile. With the introduction of HomeKit that desire has become a raging passion.
ALSO NEW UPDATES: CLICK HERE