Tuesday 24 June 2014

Download QuickBooks App For MAC

Download QuickBooks App For MAC

Hi Friends !  QuickBooks Online and its related set of apps, I’ve become a true believer. QuickBooks Online has had good iOS apps for accessing your QuickBooks Online data and now they’ve released the QuickBooks app for Mac, a free tool that brings your QuickBooks Online account to an app on your Mac.
                                 quickbooks mac app icon

QuickBooks app for Mac should not be confused with QuickBooks for Mac 2014—it’s not a standalone application, and thus, requires that you already have an existing or plan to setup a new QuickBooks Online account, which is $13 to $40 per month. QuickBooks app provides a Mac-based frontend to the QuickBooks Online Web backend, something you would normally access using a Web browser.
          quickbooks mac app 01

brings up an important note about QuickBooks app for Mac: At present it requires an active Internet connection. No Internet, no access to your data, although Intuit states that future versions of the app will allow you to work offline and sync changes to the Web once you’re connected again.
            quickbooks mac app 02
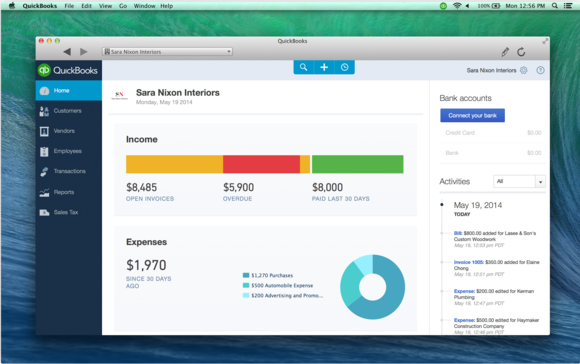
QuickBooks Online’s new interface, which rolled out to many QuickBooks Online users a month ago, the QuickBooks app for Mac interface will look familiar. QuickBooks app for Mac is a doppelgänger to QuickBooks Online’s new, less austere, graphically beautiful, and easy to master user interface. The app’s sidebar offers one-click access to QuickBooks Online’s accounting and business management tools. The app’s Home button provides a company overview that displays information on open, overdue, and recently paid invoices, current P&L and expenses. Displayed at the right of the screen is a list of all your accounts, their current balances and a number indicating how many unreconciled transactions each has.
Clicking anything you see on the Home screen takes you to the list of transactions associated with the item you’ve clicked. So, clicking the Overdue invoices link in the bar graph at the top of the QuickBooks app for Mac Home screen displays a list of all overdue transactions, where you can then select transactions and email the customers or print and send statements.
         quickbooks mac app 04
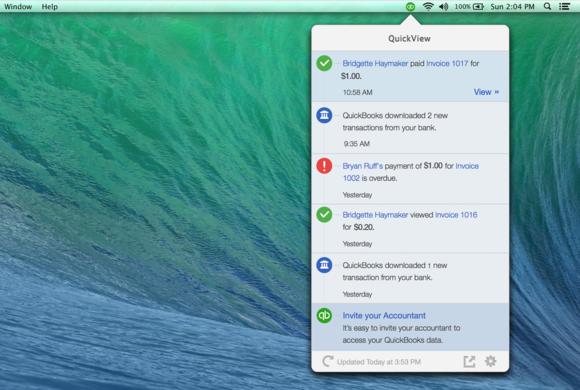
QuickBooks app for Mac is an excellent tool for managing your QuickBooks Online data using an app on your Mac rather than an app within a Web browser. While it offers nothing new in terms of features, the simplicity of using a Mac app rather than a Web app and the QuickView menu’s ability to provide up-to-date business information without requiring you to log in to your QuickBooks Online account make QuickBooks app for Mac an excellent addition to what is already a very good business accounting application.
DOWNLOAD QUICKBOOKS APP FOR MAC: CLICK HERE
MORE MAC APPS : CLICK HERE

Monday 23 June 2014

Free Download Waterfox ( 64 Bit) Browser For You'r PC (OR)  Laptop

Free Download Waterfox ( 64 Bit) Browser For You'r PC (OR) Laptop

Hi Guys! Here Waterfox is a 64-bit version of Firefox. The browser's developers modified the Firefox source code specifically for machines running 64-bit versions of Windows. Software designed for 64-bit Windows editions can take advantage of faster RAM and processing speeds and greater stability in 64-bit systems. Just converting Mozilla's source code for 64-bit Windows doesn't do enough to make Waterfox stand apart from Firefox and other Firefox-based Web browsers; other unique tweaks help it exploit the speed of 64-bit systems. As the Waterfox Web site states, speed is its mission.


personal data from Firefox. When it comes to looks and extras, Waterfox doesn't disappoint in a side-by-side comparison with the latest Firefox release. Waterfox has a family resemblance to other Mozilla-based browsers, with a dark blue Start button instead of Firefox's orange. Otherwise, Waterfox looks and functions like Firefox, including its various customizable features and options. Our add-ons, extensions, and plug-ins worked in Waterfox, too, including Microsoft's Office and Silverlight plug-ins. Waterfox also has regular updates.
We could tell with just a few quick trips to familiar sites that Waterfox is fast, so we visited some of our favorite browser speed test sites to see how it stacks up against the competition, including Firefox and our current default, Chrome. For the most revealing results, we threw Peacekeeper's HTML5 torture test at each, pitting Waterfox against the site's Chrome benchmark and our own copy of Chrome.


online benchmarking tool separates the smartphones from the gaming desktops with a series of increasingly grueling tests that took some 5 minutes to run through. Waterfox bested Firefox but not Chrome, both in speed and HTML5-rendering capability, though the results were close enough to make it a matter of choice. Raw speed tests with CNET's Bandwidth Meter produced much closer results. Chrome held a consistent edge, but Waterfox is fast, too. Subjectively, it "feels" fast, which might be the advantages of 64-bit operation. In any case, we like Waterfox a lot. If you prefer Firefox but run 64-bit Windows, give Waterfox a try.

WATERFOX FREE DOWNLOAD : CLICK HERE
ALSO NEW UPDATES : CLICK HERE

How To Remove/ Delete iOS APP'S Quickly

How To Remove/ Delete iOS APP'S Quickly

Hi Friends !  most iOS users, you have lots of apps. It’s all too tempting and all too easy to buy new ones (or download free ones) from the App Store. As a result, you probably have a number of games, productivity apps, and utilities on your iPhone or iPad that you’ve hardly ever used and aren’t likely to use in the future.But if you keep doing that, those apps will start to crowd your iOS device (and your iTunes library), taking up space and requiring frequent updates. That’s why it’s a good idea to periodically get rid of the apps you don’t use anymore. (You can always download them again from the App Store if you change your mind.) Culling your apps library can make managing your app collection easier and free up precious storage space. Here are four ways to do it.

                                                       
BEST FOUR WAYS TO IOS APPS DELETED PROCEDURE'S:

TAP AND WIGGLE:

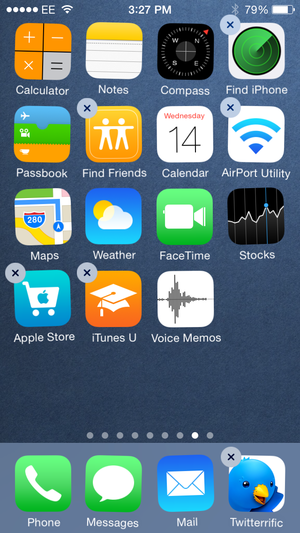
Deleting apps on an iOS device is simple: Just tap and hold any app icon until all the icons start wiggling. You’ll notice that many, if not most of them, have a little X at the top left corner..To delete an app, tap the X, then tap Delete in the dialog the displays. Note that doing so deletes not only the app, but also all of its data. So if you think you’ll need an app again soon, and you have stored data, settings or completed levels for it, you might want to think twice before tapping that X.
                                                tap and wiggle

FROM SETTINGS; 
Another way to delete apps on an iOS device is from the Settings app. Tap Settings > General > Usage, then look at the apps that display at the top of the window in the Storage section. This list is useful, because it shows how much storage each app actually uses. That may include just the app itself or the app plus all its attendant files and data. If you need to free up a specific amount of space perhaps when you want to download a movie this is a good place to look.Deleting from here is simple, too: Tap on an app’s name, then tap Delete App. You may find this quicker than tapping icons if you want to delete a lot of apps at one time.
                                     

FROM iTUNES: 
When you delete apps from your iOS device, iTunes will not copy them back on to your device the next time you sync it. So the above techniques are great if you want to delete apps from specific devices but still retain them in your iTunes library.If, on the other hand, you want to nuke them entirely, go to iTunes and choose your Apps library. Click an app to select it, then press the Delete key. Another dialogue will ask you if you want to keep the app or move it to the trash. (You may indeed want to keep them; Ted Landau recently posted a tip discussing why that can be useful.) You can remove the apps from your iTunes library, but keep them in a folder on your Mac just in case.
          delete apps in itunes
 may help to view the apps in your iTunes library in a list. Click the List button, then click the Purchase Date header to sort by the date you purchased the apps. (The Purchase Date is either the date you downloaded an app or, if it has been updated, the date of its last update.) Look at the apps with the oldest purchase dates to decide if you still use them.
WHEN UPDATING: 
 one other way you can delete apps from your iTunes library, and it’s one I use often. I have hundreds of apps, many that I use regularly, but most that I only tried out. It takes too long to go through my Apps library and try and remember what each app does. So I wait until there are updates.
In iTunes’ Apps > Updates window, you’ll see a list of new versions of apps that you can download, when an app has been updated. When I see an app in the Update window that I don’t use anymore, I delete it. To do this, right-click on an app’s icon and choose Delete. This deletes the app itself from your iTunes library, and also removes the update notification. The next time you sync your iOS devices, the apps you have deleted from your iTunes library will be removed from your devices.
TOP AND BEST iOS APPS: CLICK HERE

ANDROID APPS: CLICK HERE

How TO Root Nokia X, XL, X+ - Easy Steps

How TO Root Nokia X, XL, X+ - Easy Steps

Hi Guys! Nokia's First Android mobile is Command line Android Smartphone. Many of People don't know how to root Nokia X and X+ and XL. Nokia x is a unique and first of its kind, android phone. Nokia x uses the Microsoft services in place of the google and hence Nokia x has many different features when compared to the android phones. You will be tempted to buy the Nokia x smart phone once you go through the features of Nokia x. Nokia x is providing everything except the Google play store so today we are here with a tutorial for the Nokia x tutorial on how to root Nokia x,x+,xl and install Google play store in Nokia x. Nokia x is the never before android phone which is running on Android Jellybean operating system. Nokia x is runs on version V 4.1.2 and the Google services are not provided in the Nokia x smart phone which is going viral among the smart phones market. You can use the Nokia play store in the place of Google play store in the latest Nokia x but you cannot find all the apps in it. So the user cannot access all the apps in google store in the latest Nokia x mobile. To use all the apps from the google play store you should download app store or you can root Nokia x and install Google play store on your device.

                                              
HOW TO ROOT NOKIA X,XL,X+ , FOR EASY STEPS:

Rooting tutorial must be done very carefully and if you are first timer you should handle it very carefully because rooting may void the warranty and may brick your Nokia x device. So go through the instructions on how to root the Nokia x mobile android phone.

1. Before u start rooting ur Nokia x device , please make sure that your Nokia x device has charging more than 70% because Nokia x should not run out of charging and it should nt interrupt the rooting Nokia x process

2. Before you start rooting your Nokia x mobile take a backup of your mobile as you may not get the data in your Nokia x mobile.


3. Enable the usb debugging to root your Nokia x mobile through the given path below

.settings-applications-developement

.4. to root the Nokia x mobile go to open settings and click the scrutiny and check the unknown sources.


REQUIRED TOOLS OR APPS: 

  • Framaroot V1.9.1
  • Nokia X_Gapps
  • Root Explorer

Google this software you can easily find them.

Step1: to root Nokia x,x+,xl download frame root apps and install in to Nokia x mobile. frame root app is available on app drawer in your Nokia x mobile

Step2: open frame root app in your Nokia x mobile and choose the supersu and tap on gandalf


Step 3: You can view a message on your Nokia x mobile that superuser and subinary and you need to reboot your device

Step 4: Reboot you Nokia x device and you have root access to your device.

INSTALL GOOGLE PLAY SERVICES:

Step1: Download root explorer on Nokia x mobile and grant the root access.

Step2: Download Nokia x g apps and copy apps and change permission for those files

Step3: Install all Nokiax-gapps apk in normal mode and view the playstore after rebooting .

                                          Root Nokia x, x+, xl and Install Google Play Store

Change Your language in your Smartphone Then Restart Your Nokia X series Android mobile.

ALSO NEW TIPS FOR NOKIA MOBILES: CLICK HERE

LATEST APP"S FOR ANDROID: CLICK HERE

Sunday 22 June 2014

How To Access iCloud Files From Mac- Easy

How To Access iCloud Files From Mac- Easy

Hi Guys! iCloud serves many purposes these days. One of its main functions is document storage for the iWork suite (Pages, Numbers and Keynote) and other apps. problem with using iCloud for document storage is that it’s a black hole: Once you save a document to iCloud, you can only access it again with the same app, or its sibling, in OS X or iOS. If you have a problem with one of those iCloud apps it won’t launch, say, or an update broke it you may not be able to access your files at all.Fortunately, there are other ways to access iCloud documents on your Mac. As long as you have the Documents & Data option checked in the iCloud pane of System Preferences, iCloud copies all the documents stored in your iCloud account to your Mac, so you can work with them offline. If you ever need to access such files, there are several ways to do so.

                     
iCLOUD FILES FINDER:

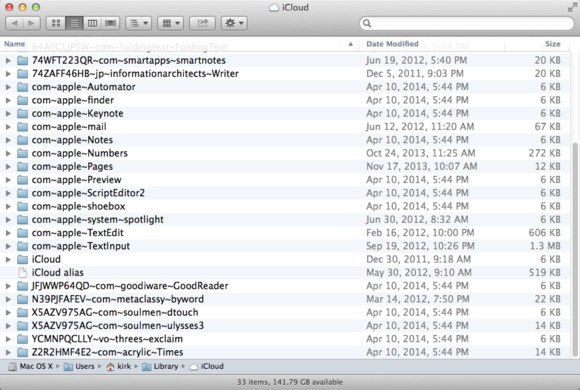
iCloud files are stored in the folder ~/Library/Mobile Documents. (The tilde symbol is a shortcut for your user folder.) Go to this folder (Finder > Go > Go to Folder), and you’ll see a number of sub-folders, one for each app. Some of these are OS X or iOS apps. If you save files with those apps, you’ll find copies of their files there. (Other apps may use such folders to hold settings for OS X or iOS apps.
            icloud finder

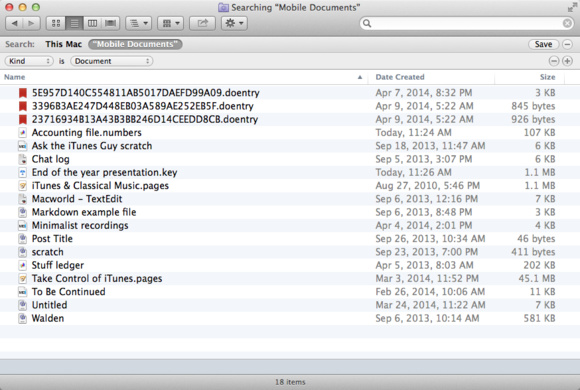
 Folder with the name of the app that saved it. Some are obvious: For example, the folder /com~apple~Pages contains Pages documents; ./com~apple~TextEdit holds your TextEdit files. Other folders have seemingly random characters an the beginnings of their names, but app names at the end.An easy way to see all your files in the Finder is to do a search from the Finder’s search field. When you’re in the Mobile Documents folder, just type a period in that field, and the Finder will find all documents with dots, or file extensions. (Make sure Mobile Documents is selected, rather than This Mac, in the Search bar.) Next, click the add (+) button below the search field, then choose Kind is Document; this will weed out a lot of settings files. Then delete the dot in the search field, and you’ll see all of your iCloud documents, from all of your apps, even if they don’t have extensions.
Click Save to save this search as a smart folder; you can then put it in the Finder sidebar to have one-click access to all your iCloud files.
              icloud search
iCLOUD FILE BROWSERS:
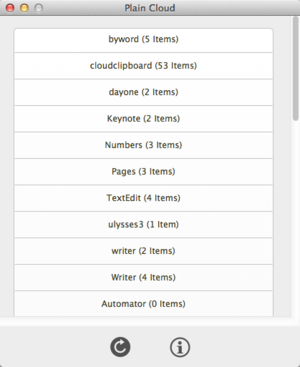
 iCloud files are stored locally on your Mac, several third-party apps let you browse these files, in a more user-friendly manner than using the Finder. free Plain Cloud is a simple app that displays a list of apps for which you have items in iCloud. Click on an app name, and Plain Cloud opens a Finder window with that app’s items. It can be a bit confusing, since Plain Cloud lists all apps that store stuff in iCloud, not just those with documents that you can access. But if you’re looking for a specific app’s files, they’re just a click away.
                                                    plain cloud

 File-management methods should replace the way you usually work with documents in iCloud-enabled apps: you should still save your files the same way. But they do offer an alternative way to access your files, when you need it.
ALSO LATEST NEWS FOR TECHNOLOGY : CLICK HERE
LATEST ANDROID APPS : CLICK HERE

Saturday 21 June 2014

How To Upgrade Your Old PC (or) Laptop With images

How To Upgrade Your Old PC (or) Laptop With images

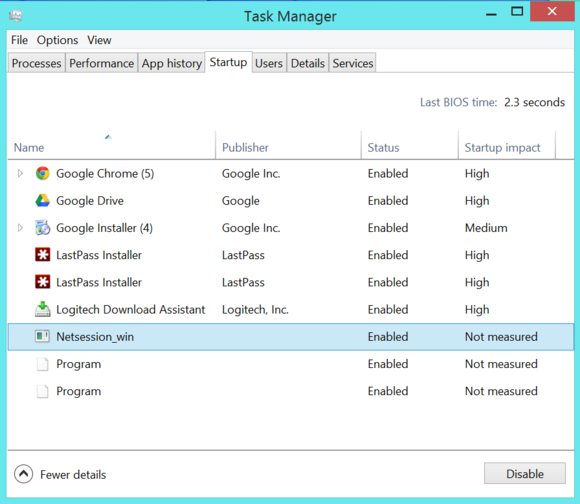
Hi Friends! PC’s hardware isn’t actually becoming slower, though. Startup programs, junk files, and even clumps of dust are just weighing it down. If you give your PC’s software and hardware a quick tune-up, it should run like it did the day you bought it. Inexpensive hardware upgrades can even make your PC run faster than it ever did.Many programs install system tray utilities or services that piggyback onto your system's startup routine, slowing your PC's boot time and wasting valuable RAM. In Windows 8, right-click your taskbar, select Task Manager, click More details, and use the Startup tab to disable programs you don’t need. The Task Manager even tells you how much time each program adds to your boot process.


HOW TO UPGRADE PROCESS WITH IMAGES:

          Windows 8 Task Manager manage startup programs

Windows 7, you can use the Startup manager in CCleaner to change which programs start after a boot. In CCleaner, navigate to Tools > Startup. Of course if you don’t use a program, you should probably uninstall it entirely from your Control Panel instead of just disabling it.

             windows 7 ccleaner manage startup programs

CLEANUP SYSTEM FILES:

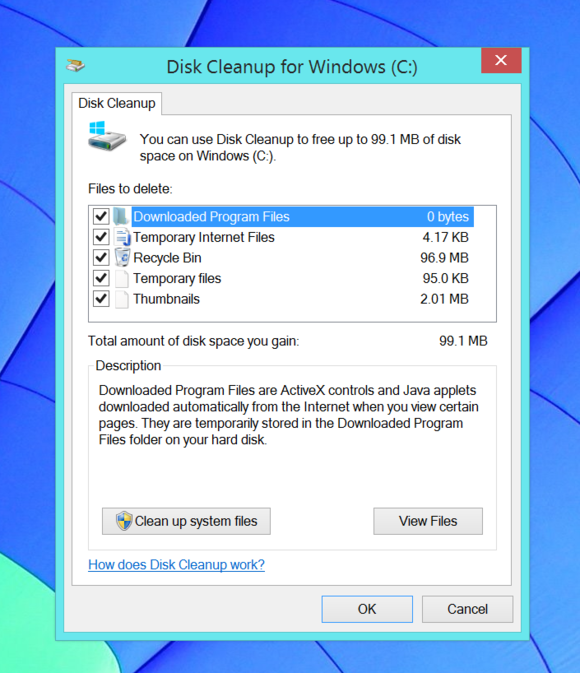
            Windows 8 Disk Cleanup

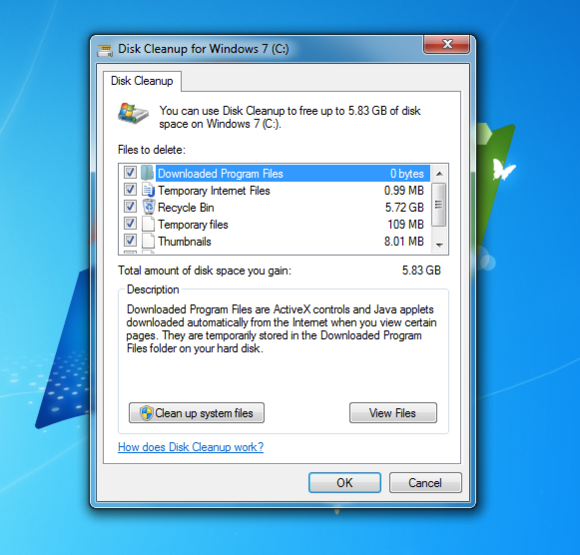
open the Disk Cleanup program on Windows, start by tapping the Windows key to open your Start menu or Start screen. Type Disk Cleanup, and click the Free up disk space by deleting unnecessary files shortcut in Windows 8 or the Disk Cleanup shortcut in Windows 7.

           Windows 7 Disk Cleanup

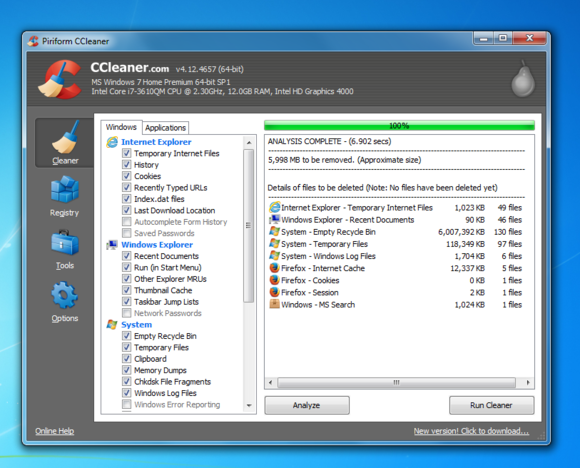
 CCleaner if you want to clean up even more types of temporary files. You may want to tweak CCleaner’s settings first though, as it will erase your browser history, cookies, cache, and other data you may want to keep.

           Windows 7 CCleaner remove temporary files

OPTIMIZE YOUR HARD DRIVE: 

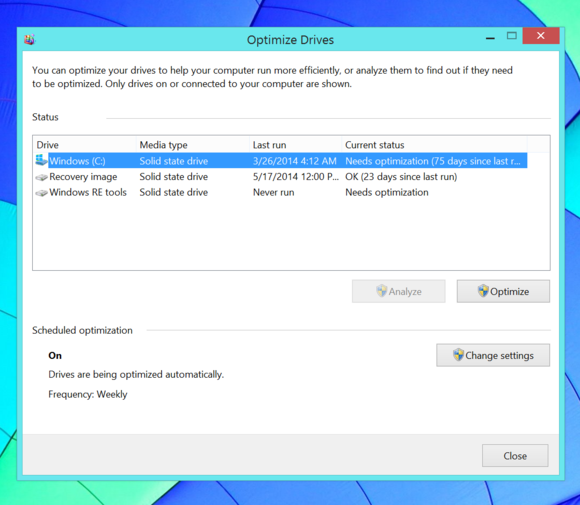
Modern versions of Windows defragment drives automatically in the background, so you probably don’t have to defragment your hard drive manually. Still, it doesn’t hurt to check.Tap the Windows key to open the Start menu or Start screen, type Defragment, and launch the Disk Defragmenter in Windows 7 or the ‘Defragment and optimize your drives tool’ in Windows 8. Analyze your drives, and the tool will tell you whether you need to defragment them.
            Windows 8 Optimize and defragment drives
KEEP SYSTEM MALWARE AND VIRUSES: 
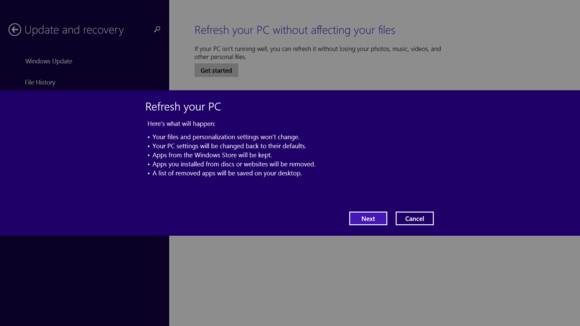
 software and otherwise playing it safe, newer kinds of malware can sneak into your system and hog resources. The nuclear option is reinstalling Windows entirely and starting afresh. In Windows 8, you can use the Refresh your PC feature to effectively reinstall Windows.  You’ll keep your personal files, but you’ll get a fresh desktop system and will have to reinstall your desktop software.
          Windows 8 Refresh PC
Windows 7, you can use your manufacturer’s recovery partition or reinstall Windows 7 from an installation disc.If you refresh your PC or reinstall Windows from your manufacturer’s recovery partition, you’ll need to clean up all that nasty bloatware to make it run as fast as possible.Old computers that came with Windows Vista can probably be sped up by updating them to Windows 8.1 or even Windows 7, but it may not be worth the $100 for a new Windows license. You’re usually better served putting that money towards newer, faster PC hardware.
ALSO READ : CLICK HERE

Top 10 Hidden Features in Windows 8 - Latest

Hi My Dear Friends! Windows 8  the desktop, which looks and feels a lot like Windows 7, and the all-new, all-singing, all-dancing Start page, which is a complete departure for the operating system.If you've just upgraded, it may take you some time to discover all of the tools hidden away in the nooks and crannies of Windows 8, so here are the top 10 hard-to-find features you should be aware of.If you've uncovered some useful tricks of your own, let us know in the comments.


1.SECRET START MENU:

Moving your mouse cursor down to the bottom-left of the screen and left-clicking switches to the tiled Start page... but if you right-click instead, you'll be met with a menu linking to key areas of the operating system, including Control Panel, the command prompt and the Task Manager.

         10 hidden features in Windows 8

2. SYNC YOU'R SETTINGS: 

Windows 8 supports the old user account system, but it can also create a new kind of user account that's linked to your Windows ID, and pulls in information from SkyDrive, Xbox, Hotmail/Outlook and all the other cloud services the company is pushing. linked account can also sync your Windows settings (from your desktop wallpaper to your browsing history) across machines, which is handy if you have multiple computers at home or at work.Launch the Settings charm, then choose 'Change PC settings' and open the 'Sync your settings' page to configure the feature.

                  10 hidden features in Windows 8
3.WINDOWS DEFENDER

Windows Defender is back from extinction, taking over from Microsoft Security Essentials.Unlike Security Essentials, Windows Defender tackles both viruses and spyware, and comes baked into the operating system.You'll notice that it makes an appearance in Windows 8 if you don't already have antivirus and anti-spyware tools in place, leaping into action to plug whichever security gaps need filling.

          10 hidden features in Windows 8

4.  same keyboard shortcut as in previous versions of Windows, but it's worth mentioning here because Windows 8 makes shutting down your PC more drawn out.Rather than opening the Charms bar, clicking Settings, selecting the Power button and choosing 'Shut down', simply press Alt+F4 while viewing the desktop.You can then press Enter to shut down the PC or choose an alternative option from the drop-down menu.

         10 hidden features in Windows 8

5.BUILT IN SCREENSHOTS:

Windows 7 had the Snipping Tool for taking screenshots, and this tool is still around in Windows 8.However, there's an even easier way to capture what's happening on your display  press the Windows key and the PrtScn button together, and a PNG grab will be automatically saved to your Pictures library.

         10 hidden features in Windows 8

6.KEYBOARD SHORTCUTS: 

Swiping and tapping around Windows 8 is fine on a touchscreen interface, but what about standard laptops and desktops?Knowing the keyboard shortcuts for Windows 8 can save you a lot of clicking and dragging with the mouse, and make it easier to navigate the operating system.Win+C brings up the Charms bar, for example, while pressing the Windows key on its own switches between the desktop and the Start page.Another useful one: hit Ctrl+Tab on the Start page to switch to the 'All apps' view.

         10 hidden features in Windows 8

7. SNAP YOU'R APPS:

may already know, Windows 7 allowed you to snap windows to the side of the screen by clicking and dragging the title bar.Windows 8 goes one step further, enabling users to dock a Start page app (like Weather or Bing) to the side while you work on the desktop.you could keep an eye on the forecast while playing around in Photoshop, or stay in touch with your Twitter feed via the People app while crunching numbers in Excel.To dock a full-screen Start page app, drag it from the top to the left or right of the screen. You can run Start page apps alongside each other too.

          10 hidden features in Windows 8

8. FILE HISTORY:

Windows 8 can keep track of previous versions of your important files, which can be a lifesaver if you accidentally delete a document or a favourite photo becomes corrupted.feature - File History - is not enabled by default, so you'll have to activate it from the System and Security section of Control Panel. The only caveat is you'll need a second hard drive available, whether this is external, internal or networked.

          10 hidden features in Windows 8

9.ISO SUPPORT

Windows 7 came with a built-in ISO burner; Windows 8 does away with the burning, and can launch ISOs (and VHD files) natively.Double-click on a downloaded or ripped ISO to view its contents; right-click and choose 'Mount' to run it.Windows 7 came with a built-in ISO burner; Windows 8 does away with the burning, and can launch ISOs (and VHD files) natively.Double-click on a downloaded or ripped ISO to view its contents; right-click and choose 'Mount' to run it.

          10 hidden features in Windows 8

10. RE INSTALL WINDOWS:

Feature you might not come across until something goes wrong - Windows' new reinstall routine, known as Reset (on the PC Settings page).There's no need to dig out discs or serial codes, because everything you need is already available, hidden away on the hard drive.Returning Windows to its factory setting takes a handful of clicks, and has never been easier.Alternatively, you can do a 'refresh', which brings back all the default operating system settings, keeping your personal files, settings, the programs that came with your PC and any applications that you have downloaded from the Windows Store.

            10 hidden features in Windows 8

ALSO MORE: CLICK HERE